Restore runbook for managed endpoints.
Performing Image Restores
The first step to perform an image restore is to download the Image Restore Manager.
Navigate to a device with NinjaOne Backup enabled, hover over the backup icon (), and select Download Image Restore Manager.

Image Authorization Key
You will also need an Image Authorization Key for the device whose data you would like to restore. An Image Authorization Key can be generated by following the same steps above.
You will be prompted to set an expiration period when generating the Image Authorization Key. The default expiration period is 14 days.

Once an Image Authorization Key has been generated for a device, it can also be manually invalidated by hovering the backup icon for the device () > Invalidate Image Authorization Key. Please note that doing so will invalidate all generated image authorization keys for the device.

Important Notes:
- An image authorization key can only be used one time. Once an authorization key has been used to grab the backup data, it cannot be used again.
- Multiple image authorization keys may be generated for a device.
When an Image Restore Key is created or invalidated it will display in the System Activities pane
Restore Options
Once you have downloaded the Image Restore Manager tool, you will see two different restore options and some restore functions under the Utilities section:
Restore Options:
- Create Bootable Media for Image Restores (Select this option)
- Restore Volume(s) or Disk(s)

Create Bootable Media for Image Restores
Important Note: If using a virtual machine (VM), make sure to give at least 2CPU to the VM. The more resources you can allocate to the VM, the more the CPU and RAM will speed up the restore process.
This option allows you to create bootable media that contains the Image Restore tool, which in turn allows you to boot a machine and perform a bare-metal restore.
Browse to select the destination for your ISO image or select a USB flash drive from the dropdown menu. All available removable drives will automatically populate in this dropdown.
Indicate whether you are restoring Windows 10 (NinjaRE-10) or Windows 11 (NinjaRE-11). If you are restoring from Windows 11 use Win-RE11. For all other versions use WinRE-10. MOST CASES USE Win-RE11 as its backwards compatible.
Finally, select whether or not to continue with the bootable media creation process if errors are encountered, and click Create.
To boot the USB media, make sure the USB drive is selected as the boot drive in your BIOS. Then, follow the prompts on the screen to perform a bare metal restore.
Restoring to Hyper-V Virtual Machine
If you are restoring to a Hyper-V virtual machine, you must choose the appropriate generation of VM. To get information on making the correct choice, navigate in the NinjaOne console to the machine you are attempting to restore. Go to Backup > Manage > select your image plan. Take note of the Disk Layout of the volume your Windows operating system is installed on (usually C:).
- If the disk layout is MBR, you must choose Generation 1 for your virtual machine.
- If the disk layout is GPT, you must choose Generation 2 for your virtual machine.
This only applies to virtual machines running on Hyper-V. The rest of this documentation still applies to the remaining restore needs.
Restore Volume(s) or Disk(s)
This option allows you to recover full disks or individual volumes directly from the cloud, or from a local storage device (depending on where backup data is stored). You also have the option to restore from an offline image archive.
To begin the restore process:
- Select the source of the restore and enter a Restore Authorization Key.

- Choose which plan and restore point you want to download. A preview of the backup content will be available in the window on the right.

- Drag and drop the backed-up data to its destination disk. You can choose to either drag an entire disk to a destination, or individual volumes.

Note: Disk initialization type must match between the original and destination disks (MBR or GPT). You can change the disk initialization type by clicking on a destination disk, clicking the trash can icon, and changing the disk initialization type in the drop-down menu.
If a volume is dragged to a disk that does not have a boot partition, you will be prompted to choose whether to add one automatically.
Important Notes:
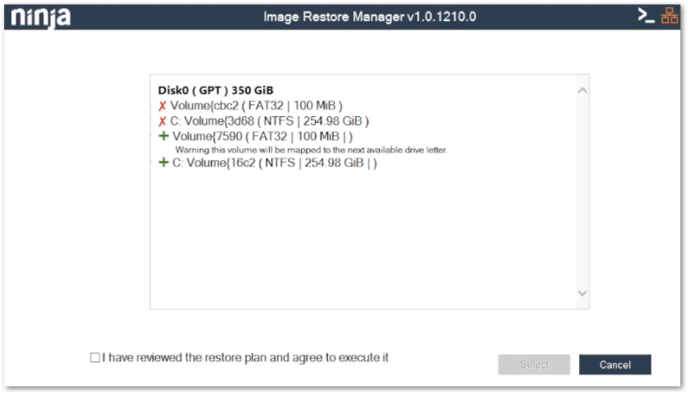
- Within the Image Restore Manager, if you drag and drop an individual volume, it will restore the volume. However, if you drag and drop the full disk, this will wipe the disk. It also may not keep the original drive letter since it is being restored.
- In the summary screen displayed for reviewing and confirming the restore, anything marked with an X is eliminated and anything with a + will be added.

DON'T CLOSE THE IMAGE RESTORE MANAGER. Verify the restore first.
Restore Verification
1. Before closing the Imager Restore Manager, open a Command Terminal in the upper-right-hand corner.
2. Run diskpart to analyze restore volumes as shown on snapshot below
Ensure volumes match the source system documentation.
3. Save Backup Restore Log - Click the upper left-hand corner of the question mark and select Activity Log. The Activity Log appears in text format. Save it.
4. Verify a successful restore and upload the log to the work order.
